Friday, June 28, 2013

YakAttack GTSL versus Scotty Slide Track

Since you came here then you are probably interested in Kayak Accessories. Check out that link for reviews of just about every kayak accessory imaginable!

A while back, both YakAttack and Scotty announced that they would be releasing a new, inexpensive polymer track. Up until now, if you wanted to use slide rails on your kayak you either had to buy a kayak that had them factory installed, or you had to spend some real money to buy them separately. These polymer rails let you inexpensively add a rail system to your kayak. While they are not as strong as metal rails (like YakAttack's GT90), they are perfect for camera or accessory mounts.


When I learned that they would be coming out, I contacted both Scotty and YakAttack. I told them that I would be doing a side by side comparison. Scotty politely thanked me. YakAttack graciously offered to give me a discount. In an effort to be unbiased, I chose to not take YakAttacks offer. The fishing world is plagued with Prostafers, sponsorships, and paid reviews that make it almost impossible to get unbiased information.

The biggest reason I chose not to take a discount on YakAttack's product was that I anticipated the GTSL to perform exactly like the Slide Track. On paper and in advertisements, they look exactly the same. With the Scotty Slide Track being less expensive, I hate to give a bad review to someone who does me a favor.

Note: after rereading this review I just wanted to clarify. YakAttack was NOT trying to buy me off. They were just being nice. Scotty has sent me free stuff as a thank you for reviewing their products. It is just the way blogging works.

This assumption that they are the same proved to be wrong. There are several minor details that are different. These small differences make one product significantly better than the other.

On to the review:

I purchased a 24" section of Scotty Slide Track on Amazon for $15. I have Amazon Prime, so it was delivered for free. I ordered two 12" sections of GTSL from Hook1. I used the coupon code "UNLUCKYHUNTER" (you can too!)  and had it delivered for just under $30. It looks like the GTSL it twice as expensive, but this is deceiving. The GTSL comes with mounting hardware. I had to buy stainless steel screws, washers, and nuts for the Slide Track. They ended up costing exactly the same.

Left: Slide Track
Right: GTSL

My initial reaction to both products was positive. They were both very sturdy. As far as strength, I'd say they are a tie. The YakAttack GTSL has a polished, glossy look that is more attractive.

Both had a few inconsistencies common in most plastic products. Most people would not notice, but I studied over them very carefully.

Left: Slide Track
Right: GTSL

The Scotty Slide Track is noticeably taller than the GTSL. This would give you a little more room to play with if you make your own slide accessories, but also gets in the way more. It looks like a small amount, but the height difference is very noticeable on the water. Both rails would occasionally get caught on stuff, the Scotty rails did it much more often.

The GTSL came with holes pre-drilled. They were considerably easier to install.

Left: GTSL
Right: Slide Track

The GTSL has small ridges molded into its face. The Slide Track rails are smooth. I initially thought this was just cosmetic, but it actually makes a noticeable difference. Things simply lock down tighter on the YakAttack Product.

GTSL in use

The GTSL is made in America and comes in a rainbow of colors. The Slide Track is from Canada and only comes in black. If you care. I don't.

Conclusion:

The Scotty Slide Track is a good product. It is sold in lots of stores, so finding it is easy. I like that you can get it in long sections. However, it is bigger than it needs to be and is ugly.

The YakAttack GTSL is also a good product. It is beautiful and better designed. Very few retailers are selling it, so you will probably have to buy it online.

For me the choice is a no brainer. Go with the YakAttack product.

That said, if you buy the Scotty product, you will most likely be pleased with your purchase.

Saturday, June 15, 2013

My New Custom Redfish Rod (Made By Me)

When shopping for a new rod, I discovered that I could not find anything that fit my needs exactly. So, I began to explore the possibility of purchasing a custom rod. After doing a little research, I realized that making a rod was within my skill-set.

After purchasing the tools and materials, I came out slightly better financially than I would have ordering a custom rod from a builder. Although, the biggest benefit is the satisfaction of making my own rod. The process was very easy and only took me about ten hours to very slowly and carefully build it. The most complex part was deciding what I wanted and what materials I needed.


It is a 7' conventional medium heavy rod with a moderate fast action.


I created a shorter than normal butt to make it easier to use in a kayak.


The reel seat is solid maple. It adheres directly to the rod blank without needing an arbor. I'm hoping this will help increase sensitivity.

I also chose to not add a fore-grip. When reeling, my hand grips the blank directly, giving me the best feel.
 

Adding the threading was the fun part. It was tedious, but I am pleased with the result, especially for my first attempt. I figured that I would be looking at this rod for countless hours, so I might as well make it look nice.


I wanted to use micro-guides, but decided that they may be too much of a challenge for my skill level. I went with reinforced saltwater grade guides. Each guide is under wrapped.

I currently have an Ambassador C3 6500 on it. After fishing with it a few times, I think this reel is too big for this rod. I'm in the process of looking for a quality low profile reel for it.

I can say that this rod is exactly what I wanted, which is why fishermen pay the big bucks for custom rods in the first place!

 
I haven't caught the Bull Red I want yet, but I have given it a good workout with this decent catfish!
I'm guessing this cat went about 12 pounds, maybe larger. My lip gripper is only rated to 15 pounds, and it could not hold up this fish. A baby by James river standards, but fun nonetheless!


Friday, June 7, 2013

Kayak Catfish Rig

In the south, catfishing is one of the surest ways to get some heavy pullage. Catfish can get big and are fairly easy to catch. Like all other fishing, catfishing is particularly fun in a kayak. However, when targeting large catfish you need to adjust your tackle a little.

When fishing from a boat or shore I use your typical heavy gear for catfishing. A Penn 309 reel spooled with 40 pound test on a short heavy rod usually does the trick. For terminal tackle I usually use a 60 pound mono leader with a 7/0 - 9/0 hook on a fish finder rig with 8 -12 OZ of weight. This will handle any catfish in America.

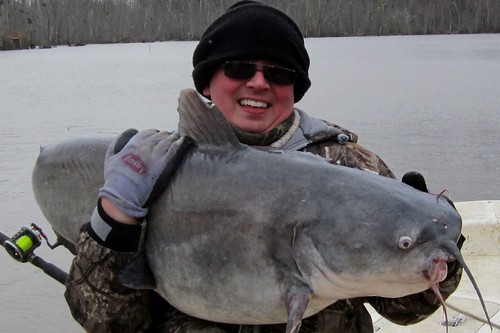
In fact, it is the rig I caught this monster on:

catfishing 019

When fishing from a kayak, you are a little more limited.

 First, you do not need a big reel. A quality reel with a nice drag is all you need. I like the Abu Garcia C3 line. A big fish will haul you around more than you will haul it, so you don't need to worry about it pulling a lot of line off your reel. Also, most of your fishing will be done by simply dropping the line over the side of your kayak or with short, precise casts. Long casts are rarely needed.

One feature that your reel should have is a clicker. This allows you to set your reel to free spool. The clicker alarms you when something takes you bait.  This is important because you never know how big of a fish is going to take your bait. A very large fish could break your rod holder, or even capsize your kayak if it takes the bait and runs while you have the drag locked down. This risk can be mitigated by using light line, but using a clicker is always the better choice.

A heavy fighting rod is also not ideal. Something with the strength and action of a musky rod is perfect. It needs to be small enough not to be cumbersome in the small constraints of a kayak, but stout enough to handle a 50+ pound fish.

Line should be lighter than normal also. You do not need super heavy line because in a kayak you fight the fish instead of horsing it in. It is amazing how large of a fish you can land with light line in a kayak. I never use anything higher than 20 pound test. The reason is mostly safety related. I want the line to break if it gets snagged and I am caught in a current or if the fish is too big. It is possible to hook a 100 pound fish in my waters. There is no way a person at my skill level could handle a fish that big in my 'yak. It would be dangerous. 

I target fish in the 30 -50 pound range. 20 pound test is plenty for this size of fish.

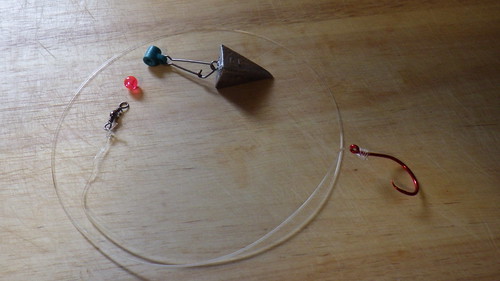
Here is the terminal rig I use:


047

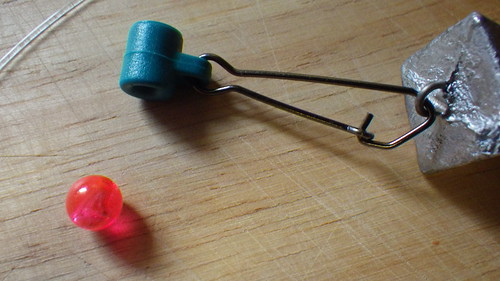
It is a 5/0 - 7/0 circle hook attached to an 80 pound mono leader. The leader attaches to a barrel swivel which attaches to the main line. A fish finder slider attached to a 2 OZ weight goes on the main line above the swivel. A bead protects the main line knot from being damaged by the weight.


049

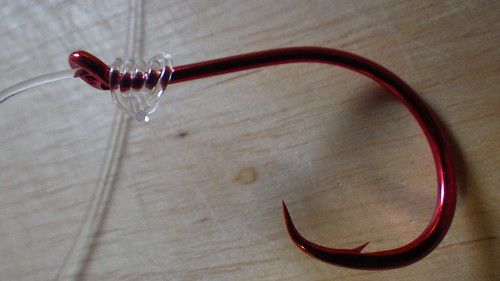
I like to use a Snell knot to attach the hook to the leader. This seems to work better with heavy line. 

Speaking of heavy line, I use 80 pound for one reason only. It is thick. Try dragging a 20 pound fish on your kayak by grabbing a 20 pound leader. It hurts! Now double that. Thin line under strain turns into a knife. I get cut all the time fishing. Never from a knife, always from line. 80 pound test gives me more to hold on to when landing big fish. It is simple as that.


050

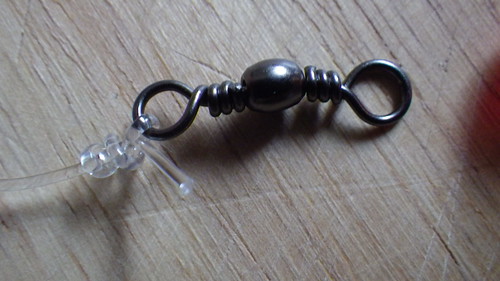
The leader attached to the swivel with a clinch knot (not an improved clinch knot). The clinch knot works better than the improved clinch on heavy mono.


051

When purchasing fish finder sliders, look for these blue ones. They seem to hold up a lot better than the yellow, snap on ones. 

A 2 OZ weight seems perfect for keeping bait down when you are simply dropping and drifting. Sometimes I use less, sometimes more. It just depends on how fast I am drifting and how deep I am going.

The bead is just a plastic bead.

There you have it. This is rig I use for hunting river monsters on the James in a kayak. What is your favorite rig?


DreamHost Promotional Code