Thursday, January 31, 2013

How to Install a Fish Finder in an Ocean Kayak Trident 13

I have been working on the rigging of my new Trident 13 for four months now. I am finished and am going to start a series of post on what I did and how I did it. I plan on finishing with a monster overview post, showing all of my customization.  This is the first post in the series.


Before we start, I have found a great place to research kayak fish finders! Click that link to find the best fish finder for you!

The Ocean Kayak Trident 13 is made to install a fish finder. It has a custom fish finder bay with sun shield and a scupper hole with a recessed area made to accommodate a transducer. Within a week of purchasing my Trident 13 I began to install a fish finder.

The first thing I realized was that while the scupper hole was made to accommodate a transducer, it was not made to accommodate just any transducer. I had to ether needed to purchase a special scupper transducer, or make my own mount. As I could not find a scupper transducer to fit my fish finder, an inexpensive Garmin echo 100, and they are expensive anyway, I chose to make my own mount.

It was very easy.

kayak blog 064

First, start out with a piece of 1/8" thick aluminum. Any thickness will do, as long as it is not easily bent. This can be purchased for a couple bucks at any hardware store. The piece needs to be large enough so that it will not fall down the scupper hole.

Then drill two 1/4" holes in the aluminum, about 1/2" apart.

Next, take a long zip tie and place it on one of the holes. Set your kayak on its side, and put the aluminum over the scupper hole, with the zip tie going through the scupper.

kayak blog 066

To attach the transducer to the mount, simply thread the zip tie through the bolt holes on the transducer. 

Now for the tricky part. Thread the zip tie back up the scupper hole and through the second hole in your aluminum plate. It helps if you have a very long zip tie.


kayak blog 067

Then just zip the whole thing closed.


kayak blog 069

My original thought was that this would be a temporary mount. I thought it might last long enough for me to devise a mount made of stainless steel bolts. However, it is amazingly secure. I have taken it out on dozens of trips without any problems. I think I will just continue to use this mount.

That is the hard part. All you have to do now is run the wires and mount the unit.


kayak blog 075

The Trident 13 has a groove in the fish finder bay that is probably for drainage, but works perfectly for running the transducer wire into the hull. 

I recommend mounting the unit before you drill any holes to run cables. This way you will know exactly where you want things to go. The last thing you want to do is make unnecessary holes in your boat! Also, be sure you goop up any holes you make with silicone. 

There will be quite a lot of excess cable. Bundle them up and zip tie them together. I hung them out of the way with zip tie mounts.


kayak blog 073

Run the power cable to the battery bag, and you are done!


kayak blog 076

If you have any questions on this install, feel free to comment below!


Monday, January 28, 2013

Updated Favorite Blogs List

Just a quick note to let everyone know that I have updated my "Other Good Sites" to reflect the blogs and sites I currently visit on a regular basis. They are all worth your time reading! The Flying Kayak, Ted's HoldOver, and The Angling Addict are my favorites. I check everyday for a new post from these guys!

Also, I was recently featured on Hunt, Prey, Eat! The question was: "What is your favorite piece of hunting gear?" Go ahead and look at what I had to say!

Sunday, January 27, 2013

Review - Abu Garcia 6600 BCX

Abu Garcia makes good reels. Their C3 Baitcast Round Reels are legendary. For this reason, when I needed to purchase a bait caster with a clicker for targeting large cats, I turned to Abu Garcia.

 
The reel I chose was the 6600 BCX . I bought it because it held a lot of line (330 yards of braid), has a clicker, and has a strong drag. Plus, it is made by Abu Garcia, which is a name I trust.

 
After about a year of use, I have mixed feelings about this reel. On one hand, it is a tough reel that can handle big fish. On the other hand, its quality and function does not live up the the Abu Garcia name.
 
 
We will start with the good.
 
Like I said before, it holds a lot of line. 300 yards of 30 pound test is overkill for use in a kayak. Line capacity is not an issue at all.
 
It is also beginner friendly. Backlashes do happen, but when they happen it is my fault. The brake works very well, perhaps too well. More on that later....
 
The clicker is loud and smooth.
 
I have not hooked into something large enough to pull drag. It is spooled with the recommended 30 pound test braid, so my drag is set to ten pounds. It takes a big fish to pull ten pounds of drag! However, when setting the drag, it seemed smooth.
 
It is a nice looking reel and is a good value at around $60.
 
 
Now for the not-so-good.

My biggest complaint is its casting range. I am very lucky to get 20 yards out of this without using a heavy weight. If i use a lure over 1.5oz, then it casts decently, but anything less and it wont cast worth crap.

It also gets much worse with use. It may cast 25 yards the first few times I cast it, but by the end of the day I am lucky to get 10 yards. I have to take it apart after each fishing trip and re-oil it or it is useless.

 
My next complaint is with its thumb release. This is a very convent feature, but causes a lot of headaches for me.

Like almost all bait casters, you depress the thumb release to put the reel in free spool, and turn the handle to engage the drag. Often, maybe every 5 casts, turning the handle does not engage the drag. It stays in free spool. I have to manually flip up the thumb release.

This is annoying and has resulted in missed fish.

This is probably due to its cheap internal parts. Most of the gears and parts inside this reel are plastic. I do not see it lasting the test of time.

 
Another (minor) gripe I have is with the clicker switch. It is very hard to turn on the clicker. I usually need to use both hands. This has gotten better over time, but after about 100 hours of use, it is still hard.
 
 
The reel is great for jigging below my kayak or for trolling, but is worthless for tossing baits.

 
If I could do it over again, I would pay an extra $40 and get something from the Abu Garcia C3 line. The BCX line just does not live up to the Abu Garcia name.


Sunday, January 20, 2013

How To Apply Decals To A Kayak

One of the fun things about kayak fishing is customizing your kayak. Everyone has their own way of doing things, no two setups are alike!
 
Being that it is winter and I cannot seem to find the fish this winter, I have been working at perfecting my kayak. One thing that I have been putting off doing is applying some custom made decals to my Trident 13.
 
Applying decals to a kayak is a little harder that applying them to a window, but not much harder.
Some kayaks have a bumpy surface that makes it almost imposable for decals to stick. The trick is to sand these bumps smooth. Use fine grit sandpaper.
 
 Fortunately for me, the Trident 13 has a smooth area on its side that is perfect for decals. I simply sanded a few bumps and scratches down.
 
 
After the sanding was complete I cleaned the hull with alcohol. Be sure is is spotless, any dirt or dust will cause the decal to not stick.
 
 
After I cleaned the hull, I heated it up with a heat gun. This step is unnecessary in the summer, but in the winter it is very important. The decal will not stick well to a cold hull.
 
Then I took a very wet rag and wiped the surface down, making sure it had a thin layer of water on it. A spray bottle would have worked better.
 
This gives me a little wiggle room to position the decal. Otherwise, it would tear if I tried to reposition it.
 
 
I carefully applied the decal, working slowly.
 
 
Then I used a squeegee to flatten it down as much as possible. You could just use your hand or fingers.
 
 
Working one letter at a time, I peeled off the backing paper. I took my time, going very slowly. If you are going to mess up, this is where it will happen.
 
As I went along I went over each letter with moistened fingers and popped any bubbles with a pin. This process took almost an hour, as I was very meticulous.
 
 
Last, just to be safe, I outlined each letter with a very thin layer of supper glue. This is probably unnecessary, but helps ease my mind.
 
 
The final product is awesome!

Keep in mind that some kayaks are treated with a chemical that resists things from sticking to it. Contact your kayaks manufacturer to see if that is the case. If it is, some extra sanding may be required.

Custom decals are cheap. I paid $8 for each of mine at CustomVinyalDecals.com. It is a great way to jazz up your boat!


Friday, January 18, 2013

How I Rig My PFD


Usually, when I fish from my kayak, I prefer to use a manually inflating PFD (Personal Flotation Device). It is supper small and light weight. I always forget that I am wearing it. The downside to this type of PFD is that I have to pull a string to inflate it.

This is fine for most of the small lakes and shallow areas I fish. There are no large boats in these areas. However, sometimes I do fish where I may get in a boating accident. If I am ever hit by a boat, I may be knocked out or hurt in some way that prevents me from inflating my PFD. For this reason, when I go out in big water I put on a traditional PFD. Specifically the NRS Chinook Mesh Back Fishing PFD .

uvs130112-001 (2)

A bonus to using a traditional PFD is that it has lots and lots of pockets!

Well, that is if you choose a fishing PFD like I did. Most kayakers know that the NRS Chinook is one of the best PFD's available. It is probably the most popular. 

This is not going to be a review of the NRS Chinook. Although, I would like to point out that they just updated this model, so you can find the old style (like the one I have) for a much lower price than normal. I think I paid around $60 for mine.

Every fisherman has their own set of priorities when outfitting their fishing vest. I consider two things when deciding what to attach to my vest. First is safety items. Second, I consider what I use the most. A kayak is cramped quarters. Reaching back, or opening a hatch takes time and makes noise.


Safety items are the most important things attached to your vest. They are worthless if left in a tackle box. If an accident happens you will most likely be ejected from your boat, so all you will have is what is on your person. 

A knife and whistle are the minimum. 

Whistles are mandatory here in Virginia. Don't get one of those crappy whistles. It needs to be loud and work when wet. The Scotty Life Saver Whistle is the best I have found.

Your knife should be quickly accessible, should open with one hand, and be stainless steel. Kayak for long and your knife will save your butt. Once I had to cut my anchor line because it got jammed on the bottom and the current was pulling me under. I use it very often to cut heavy line or even brush that I am snagged on.

I also keep my waterproof cell phone attached and stuffed inside my vest. A VHF radio would be a good choice too. 


Forceps are my most used tool. I use then almost every time I land a fish. attaching them to a zinger is a no-brainer.

The other tool I use a dozen times or more each trip is line nippers. They are also attach to a zinger. 


In one of the pockets I keep a small box of the lures I plan on using. One of the keys to catching fish is keeping your hooks sharp. With my extra lures immediately available, I am much more likely to retie if a hook starts to get dull. 


In the other large pocket I keep a pair of heavy stainless steel fishing pliers, some zip ties, and some rubber bands. 

I use the zip ties to position and keep pieces of bait on a hook. Rubber bands are used for the same thing in addition to making jigs weedless. Place the rubber band on the barb of the hook and stretch it over the eye of the jig head. Bam! weedless!

See that circle thing with the plus sign on it between the pliers handle in the picture above? That is a mount for pin on zingers. I never knew and had to ask. Just passing the knowledge on.


The Chinook has reflectors on the front shoulder. I cover these with cloth tape because they reflect a cameras flash at night, ruining pictures. I know this is less safe, but life is a balance of safety and function. 

Depending on my plans, I may add a stick of scent, some sunblock, or some additional gear. The key is keeping everything you use often easily accessible.

Let me know in the comments what you keep in your fishing vest!


Sunday, January 6, 2013

Why Fishing Line Breaks

It has happened to every fisherman. You are fighting a fish, usually a big one, and all of a sudden the fight ends. The line broke. You are left wondering what happened. Why did the line break?

The truth is that fishing line in good condition is very strong. I often fish with 4 pound test and am always amazed that when I get a snag I can pull myself and my kayak, about 250 pounds combined, with it. According to tests done by the IGFA, most monofilament fishing lines break at 50% - 100% of their rated strength. Braid is even stronger routinely breaking at up to 300% of its rated strength. That 20 pound test braid you use is probably closer to 60 pound test.

Then why does it break? If 4 pound test can pull a 250 kayak and its breaking point is actually much higher than 4 pounds, why can a 6 pound fish break it with no problem.

If your line breaks while you are fighting a fish, you can bet it was because of one of these seven reasons:

1. A poorly tied, or damaged knot.

Knots are the weakest point in your line. A poorly tied knot will slip, coming untied under pressure. A poorly tied knot can also weaken the line, reducing it strength by 50% or more. Damage to the knot by sharp rocks or teeth will almost guarantee a break off.

You can tell if your knot slipped by the end of your line. If it is twisted, then the failure probably happened at your knot.

Twisted line from a slipped knot
The best way to ensure that this does not happen is to simply practice tying good knots. You should have one or two main knots that you can tie perfectly with your eyes closed. Keep in mind that some lines, specifically braid, require special knots.

Also, after a big fight or snag, cut your line and retie. This will prevent unseen damage to your knot from affecting you.

2. Nicked line.

A nick in your line can reduce its strength tremendously. It just makes common sense. A nick half way through your line will reduce its strength by at least 50%.


Severely nicked line
Nicks can happen from almost anything. A rough guide, rubbing the side of your boat, a log or rock, or even the scales of a hard fighting fish can nick your line.

Nicks right above a break off is a sure sign that your line was damaged.

To find nicks in your line, simply run the line through two pinched fingers. Any roughness that you feel indicates a nick. This section of line needs to be cut out. Make a habit of testing the last 6 feet of line after ever catch or snag and the last 30 feet after each outing.

3. The line has reached its non-recoverable distortion point.

Mono stretches. A bunch. 50 feet of mono can easily stretch 5 feet during a hard fight. This is not necessarily a bad thing. This stretch keeps pressure on the fish while protecting the line from shock. It springs back to place once the pressure is relieved.

There is a point, however, that mono becomes too stretched out. When it reaches this non-recoverable distortion point, it changes on a molecular level. It becomes weak and brittle.

The problem is that it is almost impossible to tell if this has happened. The best thing to do is never pull on your line to break off a snag. This will definitely cause the line to reach its non-recoverable distortion point. Always cut 6 feet off your line after a break off of any type. Hopefully this will trim off any of the over stretched portions.

4. A poorly set drag.

Your reels drag is designed to give before your line does. If your drag is set too high it will apply too much pressure to the line, causing a break off. It is my experience that most people apply way to much drag pressure.

Your drag should be set to 25% to 30% of your line strength. So, if you use 10 test line, your drag should slip at about 3 pounds. You can easily test this by tying your line to a fish scale and pulling. Loosen the drag until it slips at the right pressure.

5. Fine abrasions on line.

Lots of tiny nicks, to small to be felt, can add up to a big reduction in line strength.

These abrasions are usually caused by your line rubbing against a rough log or rock.

 
The only way to test your line for this is to look closely. If it has a washboard type pattern on it, like the picture above, it is damaged.

Cut the damaged line out.

6. UV light damage.

UV rays damage everything, fishing line included. "Rotten" line is usually caused by UV light. This will weaken your line to the point that simply casting it will break it.

IMG_1704

Store your reels and line out of the sunlight and change your line every season.


7. A smart (or lucky) fish.

A smart (or simply lucky) fish will try to wrap your line around an object. If it does this, your drag no longer affects the fish and the line is shorter, meaning less stretch. Plus, the line will be weakened by rubbing against the object it is wrapped around. This almost guarantees a break off.

The only thing you can do is try to keep fish away from structure when you are fighting them.

The solution to break offs

There are a few things you can do to prevent break offs. First, use a high quality fluorocarbon leader. Fluorocarbon is very resistant to abrasion. Second, inspect your line after each hookup or snag. If you find damage, cut it out. Third, tie good knots and retie often. Fourth, always cut off the last ten feet or so of line when you get home after each trip. This will remove unseen damage and keep your line fresh. Lastly, replace your line often.


Friday, January 4, 2013

Review - Work Sharp Guided Field Sharpener

If you are looking for the best pocket knife sharpener, check out this link out!


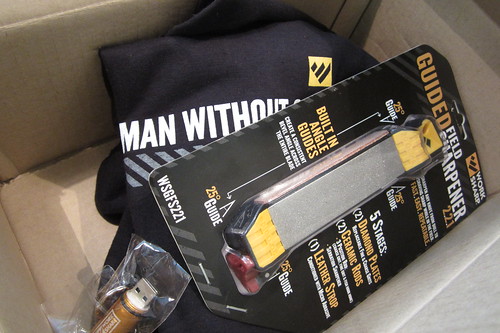
Work Sharp recently sent me their new Guided Field Sharpener to review. Before I get into the review I want to stop and commend the promotion department at Work Sharp. Not only did they send me the sharpener, they sent me a USB stick, a big stack of stickers with fun quotes, and a nice t-shirt (which my wife promptly stole). Thanks Work Sharp!

Also, big thanks to The Outdoor Blogging Network for setting up this review and many others!


On to the review.....

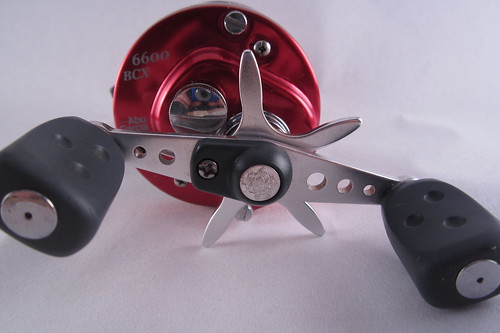
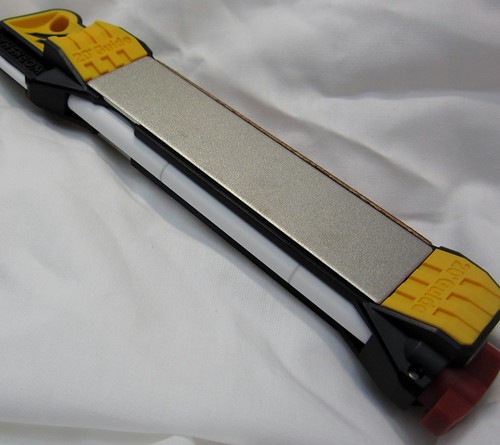
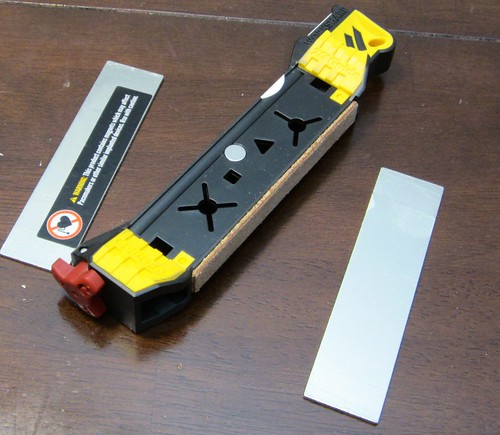
The Guided Field Sharpener is an all in one sharpener with an impressive list of functions. It has:

  • Coarse and fine diamond plates
  • Ceramic rod with fishhook sharpener
  • Leather strop
  • Serration sharpener
  • Honing guides
  • Broadhead wrench


Any time I see an all-in-one unit like this I am skeptical. It is my experience that multi-use products often do a lot of things adequately, but nothing great.

Let's find out if that is the case with this sharpener.


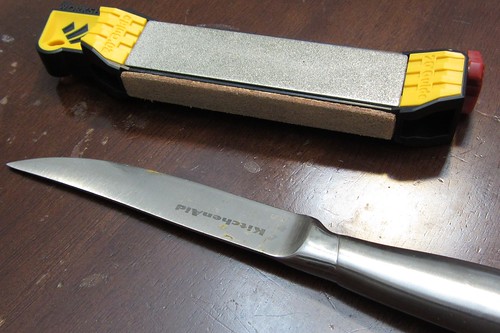
I started out with a knife that already had a working edge, but was not up to my standards. My standards? For me to consider a knife sharp it must be able to shave the hair on my arm without resistance.


After five minutes, about ten swipes on each side of the blade with the fine diamond plate, ceramic rod, and leather strop, it was sharp as a razor.

I question the usefulness of the leather strop. I could not tell a difference between using it and not using it.This could just be my technique.

A good start. Now for a real challenge.

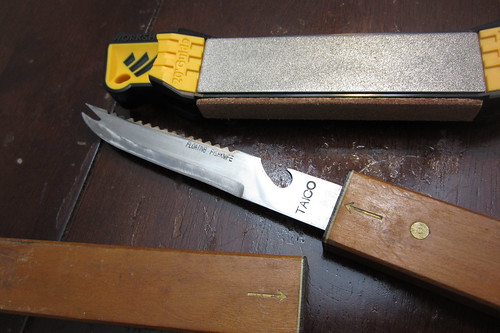
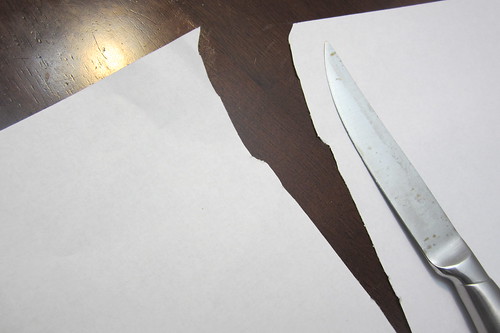
Next, I pulled a kitchen knife out of a drawer. It was so dull it could not cut paper. The edge was chipped and flattened in some areas.


If the Guided Field Sharpener could get this knife sharp, it could get any knife sharp!


I started with the rough diamond plate and created a new edge. The built in guides made this very easy and the diamond plate cut deeply and quickly.


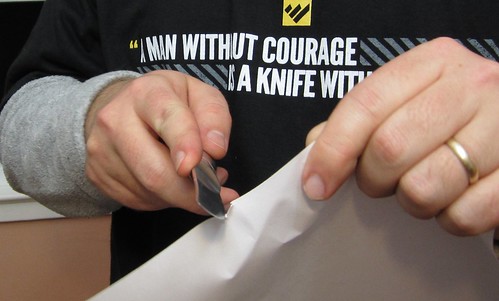
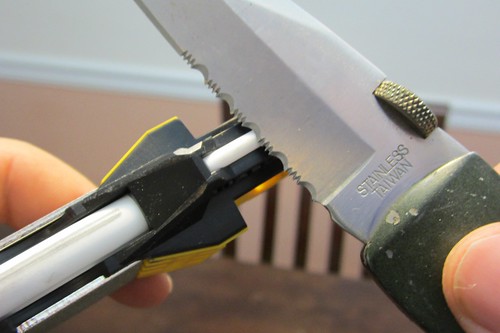
Lets stop and have a talk about safety.

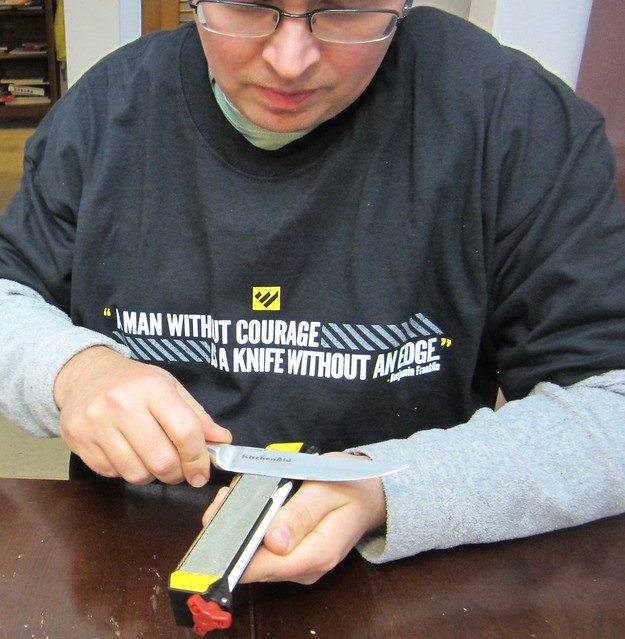
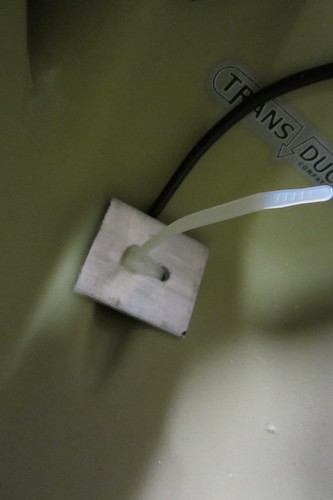
In the picture above I am holding this sharpener incorrectly. If the knife was not so dull, I would have sliced my thumb open. I initially thought this sharpener was unsafe, until I read the directions. It is meant to be placed on a flat surface, like the picture below.

As an alternative, they suggest holding onto its tiny handle. I personally found this handle way too small for a good grip.


It took a while, and I never got the knife sharp enough to shave with, but it did get much sharper. Certainly sharp enough to clean a fish or gut a deer with.


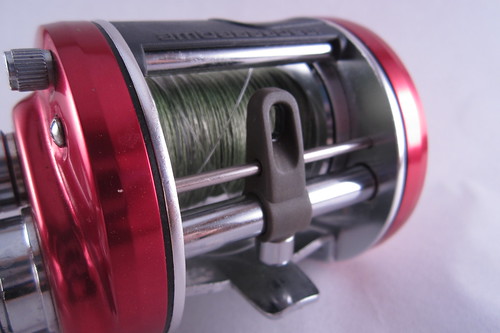
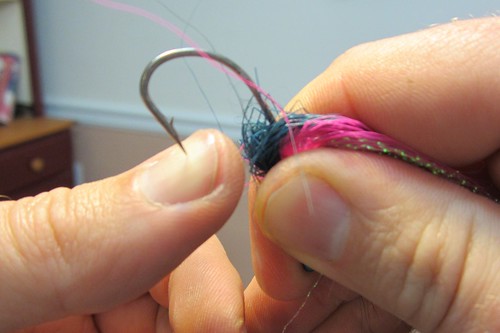
Next, I tested the hook sharpener. I was most excited about this. A good hook sharpener is hard to find, and can save your day when fishing.

I test my hooks with the thumb nail test. If the point grabs and digs into my thumb nail, it is sharp. If it slides, then it is dull.


I ran into a few problems here.

First, the grooves in the ceramic rod were too large for my fishhook, and I was using a big hook. Luckily  the "coarse" side of the ceramic rod had nice, smaller grooves that worked perfectly. 

(By the way, Work Sharp advertises this coarse ceramic rod for heavy use items. Personally, I think this is bunk. All it is is a ceramic rod with small grooves running down it.  I see no reason to sharpen your knife with this "coarse" ceramic rod, when you have a normal one at your disposal. It seems like they are just trying to add to their list of features)

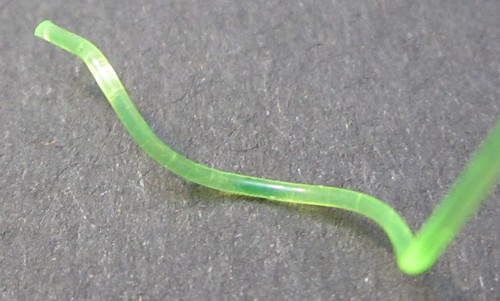
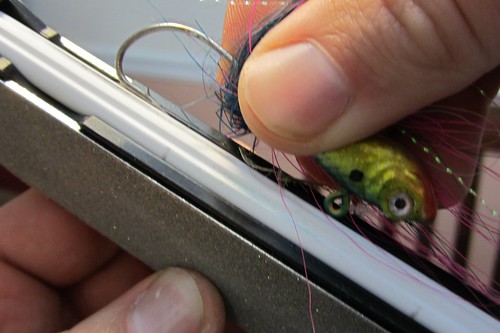
Another problem I had was with the eye of my jig. As you can see in the picture below, the eye of the jig hit the rod, preventing the point of the hook from making contact with the rod. Normally I would just use the end of a sharpener, hanging the eye over the edge. However, the sharpening guides prevented me from doing this. I overcame this by twisting the hook a little, allowing the point to drop down. 


I had a similar experience with the serration sharpener. Neither, the small serration rod nor the large ceramic rod fit the grooves of any of my knives. It would still sharpen, but not the entire serration edge.

You really need a tapered rod to properly sharpen serrations.


The unit is held together by powerful magnets and has a hollow area that could be used to carry matches or something else small. This also makes it easy to clean, which needs to be done after every few sharpenings or the pores in the plates and rods will get clogged.

It is fairly heavy, especially for something called a Field Sharpener. If by "field" they mean "keep in your truck" then I agree. If, however, the mean "keep it in your pocket" I disagree. I protect every ounce in my pack and pockets when I am hunting. This is just too heavy.

After rereading the previous paragraph, I think I need to clarify. It does not weigh a ton, or even a pound. It is just heavy for what it is.


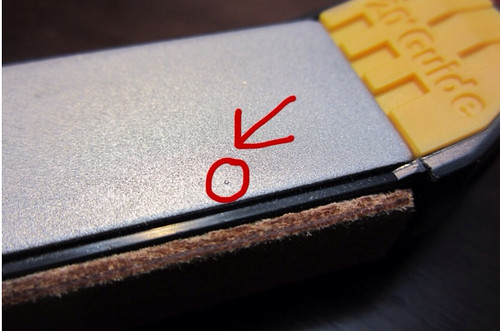
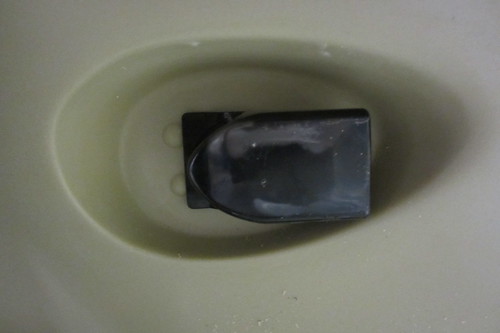
My only real complaint was with a manufacturing flaw in the fine diamond plate. It is hard to see in the picture below, but there is one grain that is raised above the others. This nicked the blade of my knife on every pass, denting the edge. This could cause serious damage to a knife edge, even to the point of making the knife unusable without a lot of work.

I quickly fixed the problem by rubbing the fine and course diamond edges together. This sanded down the bump perfectly. 


Summary:

Pro's
The Guided Field Sharpener has everything you need to get a knife sharp. It works quickly and easily. A beginner who followed the directions would have no trouble getting a good edge. It is rugged enough to be used in the field without worry.

Con's
The hook sharpener and serration sharpener do not work as well as a dedicated sharpener would. The need of the leather strop is questionable. It is heavy compared to other pocket sharpeners.  Be sure to check the diamond plates for flaws like mine. Hopefully, mine was an aberration.

Overall, I like this sharpener. It does a good job at simply sharpening knives. Much better than most sharpeners out there right now. You can find them for around $30.

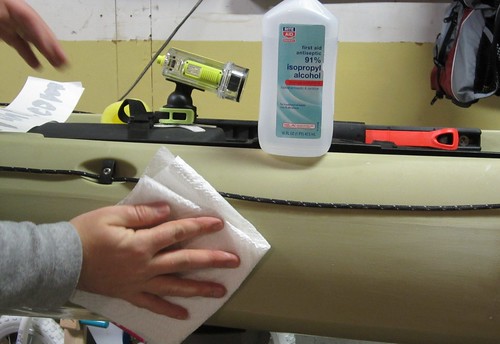
It has earned a permanent place in my kayak where it will be used every time I go out.

I received the Work Smart Guided Field Sharpener for free in exchange for this review. This review is 100% my honest opinion. I received no compensation for it, other than the sharpener itself. 


DreamHost Promotional Code