Friday, June 28, 2013

YakAttack GTSL versus Scotty Slide Track

Since you came here then you are probably interested in Kayak Accessories. Check out that link for reviews of just about every kayak accessory imaginable!

A while back, both YakAttack and Scotty announced that they would be releasing a new, inexpensive polymer track. Up until now, if you wanted to use slide rails on your kayak you either had to buy a kayak that had them factory installed, or you had to spend some real money to buy them separately. These polymer rails let you inexpensively add a rail system to your kayak. While they are not as strong as metal rails (like YakAttack's GT90), they are perfect for camera or accessory mounts.


When I learned that they would be coming out, I contacted both Scotty and YakAttack. I told them that I would be doing a side by side comparison. Scotty politely thanked me. YakAttack graciously offered to give me a discount. In an effort to be unbiased, I chose to not take YakAttacks offer. The fishing world is plagued with Prostafers, sponsorships, and paid reviews that make it almost impossible to get unbiased information.

The biggest reason I chose not to take a discount on YakAttack's product was that I anticipated the GTSL to perform exactly like the Slide Track. On paper and in advertisements, they look exactly the same. With the Scotty Slide Track being less expensive, I hate to give a bad review to someone who does me a favor.

Note: after rereading this review I just wanted to clarify. YakAttack was NOT trying to buy me off. They were just being nice. Scotty has sent me free stuff as a thank you for reviewing their products. It is just the way blogging works.

This assumption that they are the same proved to be wrong. There are several minor details that are different. These small differences make one product significantly better than the other.

On to the review:

I purchased a 24" section of Scotty Slide Track on Amazon for $15. I have Amazon Prime, so it was delivered for free. I ordered two 12" sections of GTSL from Hook1. I used the coupon code "UNLUCKYHUNTER" (you can too!)  and had it delivered for just under $30. It looks like the GTSL it twice as expensive, but this is deceiving. The GTSL comes with mounting hardware. I had to buy stainless steel screws, washers, and nuts for the Slide Track. They ended up costing exactly the same.

Left: Slide Track
Right: GTSL

My initial reaction to both products was positive. They were both very sturdy. As far as strength, I'd say they are a tie. The YakAttack GTSL has a polished, glossy look that is more attractive.

Both had a few inconsistencies common in most plastic products. Most people would not notice, but I studied over them very carefully.

Left: Slide Track
Right: GTSL

The Scotty Slide Track is noticeably taller than the GTSL. This would give you a little more room to play with if you make your own slide accessories, but also gets in the way more. It looks like a small amount, but the height difference is very noticeable on the water. Both rails would occasionally get caught on stuff, the Scotty rails did it much more often.

The GTSL came with holes pre-drilled. They were considerably easier to install.

Left: GTSL
Right: Slide Track

The GTSL has small ridges molded into its face. The Slide Track rails are smooth. I initially thought this was just cosmetic, but it actually makes a noticeable difference. Things simply lock down tighter on the YakAttack Product.

GTSL in use

The GTSL is made in America and comes in a rainbow of colors. The Slide Track is from Canada and only comes in black. If you care. I don't.

Conclusion:

The Scotty Slide Track is a good product. It is sold in lots of stores, so finding it is easy. I like that you can get it in long sections. However, it is bigger than it needs to be and is ugly.

The YakAttack GTSL is also a good product. It is beautiful and better designed. Very few retailers are selling it, so you will probably have to buy it online.

For me the choice is a no brainer. Go with the YakAttack product.

That said, if you buy the Scotty product, you will most likely be pleased with your purchase.

Saturday, June 15, 2013

My New Custom Redfish Rod (Made By Me)

When shopping for a new rod, I discovered that I could not find anything that fit my needs exactly. So, I began to explore the possibility of purchasing a custom rod. After doing a little research, I realized that making a rod was within my skill-set.

After purchasing the tools and materials, I came out slightly better financially than I would have ordering a custom rod from a builder. Although, the biggest benefit is the satisfaction of making my own rod. The process was very easy and only took me about ten hours to very slowly and carefully build it. The most complex part was deciding what I wanted and what materials I needed.


It is a 7' conventional medium heavy rod with a moderate fast action.


I created a shorter than normal butt to make it easier to use in a kayak.


The reel seat is solid maple. It adheres directly to the rod blank without needing an arbor. I'm hoping this will help increase sensitivity.

I also chose to not add a fore-grip. When reeling, my hand grips the blank directly, giving me the best feel.
 

Adding the threading was the fun part. It was tedious, but I am pleased with the result, especially for my first attempt. I figured that I would be looking at this rod for countless hours, so I might as well make it look nice.


I wanted to use micro-guides, but decided that they may be too much of a challenge for my skill level. I went with reinforced saltwater grade guides. Each guide is under wrapped.

I currently have an Ambassador C3 6500 on it. After fishing with it a few times, I think this reel is too big for this rod. I'm in the process of looking for a quality low profile reel for it.

I can say that this rod is exactly what I wanted, which is why fishermen pay the big bucks for custom rods in the first place!

 
I haven't caught the Bull Red I want yet, but I have given it a good workout with this decent catfish!
I'm guessing this cat went about 12 pounds, maybe larger. My lip gripper is only rated to 15 pounds, and it could not hold up this fish. A baby by James river standards, but fun nonetheless!


Friday, June 7, 2013

Kayak Catfish Rig

In the south, catfishing is one of the surest ways to get some heavy pullage. Catfish can get big and are fairly easy to catch. Like all other fishing, catfishing is particularly fun in a kayak. However, when targeting large catfish you need to adjust your tackle a little.

When fishing from a boat or shore I use your typical heavy gear for catfishing. A Penn 309 reel spooled with 40 pound test on a short heavy rod usually does the trick. For terminal tackle I usually use a 60 pound mono leader with a 7/0 - 9/0 hook on a fish finder rig with 8 -12 OZ of weight. This will handle any catfish in America.

In fact, it is the rig I caught this monster on:

catfishing 019

When fishing from a kayak, you are a little more limited.

 First, you do not need a big reel. A quality reel with a nice drag is all you need. I like the Abu Garcia C3 line. A big fish will haul you around more than you will haul it, so you don't need to worry about it pulling a lot of line off your reel. Also, most of your fishing will be done by simply dropping the line over the side of your kayak or with short, precise casts. Long casts are rarely needed.

One feature that your reel should have is a clicker. This allows you to set your reel to free spool. The clicker alarms you when something takes you bait.  This is important because you never know how big of a fish is going to take your bait. A very large fish could break your rod holder, or even capsize your kayak if it takes the bait and runs while you have the drag locked down. This risk can be mitigated by using light line, but using a clicker is always the better choice.

A heavy fighting rod is also not ideal. Something with the strength and action of a musky rod is perfect. It needs to be small enough not to be cumbersome in the small constraints of a kayak, but stout enough to handle a 50+ pound fish.

Line should be lighter than normal also. You do not need super heavy line because in a kayak you fight the fish instead of horsing it in. It is amazing how large of a fish you can land with light line in a kayak. I never use anything higher than 20 pound test. The reason is mostly safety related. I want the line to break if it gets snagged and I am caught in a current or if the fish is too big. It is possible to hook a 100 pound fish in my waters. There is no way a person at my skill level could handle a fish that big in my 'yak. It would be dangerous. 

I target fish in the 30 -50 pound range. 20 pound test is plenty for this size of fish.

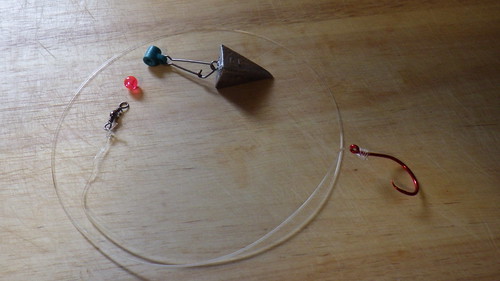
Here is the terminal rig I use:


047

It is a 5/0 - 7/0 circle hook attached to an 80 pound mono leader. The leader attaches to a barrel swivel which attaches to the main line. A fish finder slider attached to a 2 OZ weight goes on the main line above the swivel. A bead protects the main line knot from being damaged by the weight.


049

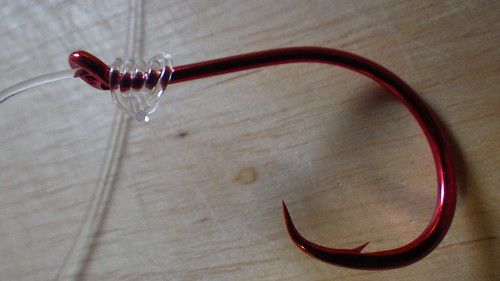
I like to use a Snell knot to attach the hook to the leader. This seems to work better with heavy line. 

Speaking of heavy line, I use 80 pound for one reason only. It is thick. Try dragging a 20 pound fish on your kayak by grabbing a 20 pound leader. It hurts! Now double that. Thin line under strain turns into a knife. I get cut all the time fishing. Never from a knife, always from line. 80 pound test gives me more to hold on to when landing big fish. It is simple as that.


050

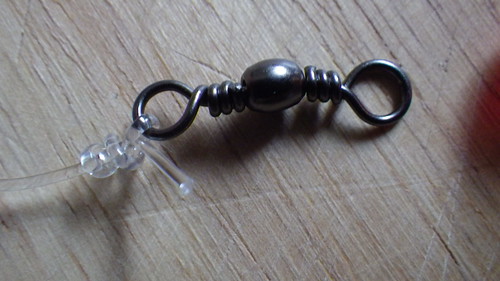
The leader attached to the swivel with a clinch knot (not an improved clinch knot). The clinch knot works better than the improved clinch on heavy mono.


051

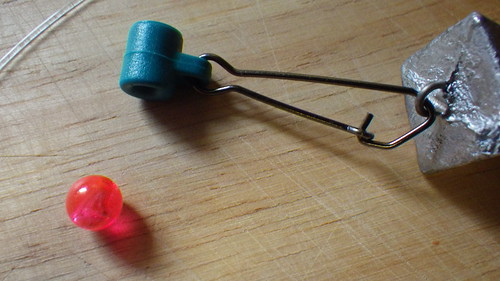
When purchasing fish finder sliders, look for these blue ones. They seem to hold up a lot better than the yellow, snap on ones. 

A 2 OZ weight seems perfect for keeping bait down when you are simply dropping and drifting. Sometimes I use less, sometimes more. It just depends on how fast I am drifting and how deep I am going.

The bead is just a plastic bead.

There you have it. This is rig I use for hunting river monsters on the James in a kayak. What is your favorite rig?


Saturday, May 25, 2013

How To Pour Your Broken Soft Plastic Lures Into New Ones

Soft plastics catch fish. They are my favorite type of bait, hands down. The problem with soft plastics is that they do not last long. If I can catch 3 fish on one before it is destroyed, I feel lucky.
Instead of tossing my old torn soft plastics, I recycle them into custom poured baits.
 
 
It is stupidly easy and inexpensive. All you need is a small glass container, some gloves, a microwave, and a mold.
 
 
The mold is probably the only thing you will need to buy. I got mine on ebay for $7 shipped. So, for about the price of one bag of soft plastics, I can make an infinite supply from my broken baits.
 
I chose a 5.5" lizard mold as it is my confidence bait and can be hard to find. You can find a mold for just about anything.
 
 
The first step is to put a couple baits in the glass container. Don't put too many in at first.
 
 
Then microwave them until they are melted. I start with 1:20, but check it constantly. You do not want to burn it. It is very stinky, so have an open window or exhaust fan going.

 
Put on your gloves and stir the molten baits with a toothpick or something.

It will be extremely hot. I often get burnt through my gloves. Be very, very careful!

 
Slowly, and carefully pour the melted plastic into the mold.

 
The more careful you are, the less trim work you will have to do.
 
 
The plastic cools quickly. After a min or two, carefully peel your new bait out of the mold.

 
Notice the areas you will need to trim.


Take a sharp knife or scissors and trim up your bait.
 
 
Your hand poured baits will probably not look as nice as ones from a factory. They will have some jagged edges and uneven areas. Don't wory, they will fish just as well. In fact, your baits may have some unique action.

 
Once you get the hang of it, you can try to make some neet two tone baits. You can make some cool baits that you simply cannot find in stores.
 
 
In one evening, I was able to make a nice pile of lures at virtualy no cost.


Wednesday, May 22, 2013

Kayak Anchoring System

I have been working on the rigging of my new Trident 13 for several months now. I am finished and am going to start a series of post on what I did and how I did it. I plan on finishing with a monster overview post, showing all of my customization. This is the tenth post in the series.

1st post: Installing a Fish Finder 
2nd post: Upgrading a Plano Dry Box
3rd post: How To Install SuperNova Fishing Lights On Your Kayak
4th post: Install Scotty Flush Mounts on a Kayak
5th post: YackAttack GearTrack GT90 Install and Review
6th post: The Ultimate DIY Kayak Crate - Part 1
7th post: The Ultimate DIY Kayak Crate - Part 2
8th post: Silent Traction System Install
9th post: A Few Little Improvements To The Trident 13


I have put this post off because it has been done a hundred times. And yet, it is one of the most asked questions on kayak forums. "How do you use an anchor on a kayak?"

It is an important question because A) Most kayak anglers will need to use an anchor and B)  anchoring a kayak is dangerous.

When I say dangerous, I mean it can kill you if done improperly. If a strong current or large wave hits you while anchored incorrectly you will capsize. If you get tangled in a caught anchor when overboard,  you can drown. In some situations, even while wearing a PFD. Sometimes you have to move NOW to get out of the way of a boat or position yourself to take a wave. An anchor will prevent you from doing this.

So, what are the considerations when using an anchor in a kayak?

First, the anchor needs to be attached to your bow or stern. This will allow you to ride out a wave or current. If it is attached to the side of your boat, a wave or strong current can flip your kayak very easily. This creates a challenge as most kayakers do not have easy access to their bow or stern while paddling.  There are a couple ways to combat this, but I believe the best way is with an anchor trolley.

An anchor trolley is a loop of rope attached at one end to either or bow or stern and the other end to the side of your boat where you can reach it. The loop of rope has a ring tied on it. You attach your anchor line to this ring and then by pulling on the loop of rope, run the ring to the front (or rear) of you kayak.  It is confusing to explain, but actually quite simple.

There are a lot of fancy anchor trolley designs out there. You can even buy a pre-made kit like this one.  A lot of them use pulleys. I prefer to keep things simple, pulleys bind at the most inopportune times and complex things are hard to repair in the field.

My anchor trolley is simply made of Paracord , a two Stainless Steel Rings , a Pad Eye , three Carabiners , and a Cutting Board .

I actually put two anchor trolleys on my Trindent 13, one for the stern and one for the bow. This way I can point myself in any direction I want.


I started out by adding a pad eye to the bow of my kayak and running a carabiner through it. Then I attached one end of my trolley rope to the carabiner.


At the other end, right where my elbow is when I an sitting, I added another carabiner. I was able to attach it to existing hardware on my boat. You may need to add a pad eye here. Again, I ran the trolley rope through the carabiner. Here is another picture of this:

Yes, my kayak is always this dirty. 
The rear anchor trolley is very similar except instead of adding a pad eye to the rear, I made a mount out of a cheap peace of cutting board and attached it to the rudder mount.


This allows me to get the anchor all the way to the back.

This solves the problem of keeping our anchor to the bow or stern, but how do we keep from getting caught up in our anchor?

We have to create a quick disconnect. This is vitally important. There will come a time when you will need to dump your anchor. You will either need to get out of the way of something FAST, or you will hook a big fish and want to go for a sleigh ride (one of the most exciting parts of kayak fishing).

This is how I do it: (Warning: it is slightly complex.)


That is the big picture, lets zoom into the important part.


Take your anchor line and create a loop. Run that loop though your trolley ring, position your anchor trolley to the stern or bow, and cleat it off. Now, if you need to dump your anchor, you just have to un-cleat it. The loop will pull itself out of the ring.

The cleat I currently have installed is a Zig-Zag Cleat .


This is not the best. It is much faster to disconnect a Cam Cleat . I will be making this upgrade soon.

As for the anchor itself, I use a homemade one.


I just used some scrap metal I had laying around and welded it up. It works as well as those collapsible anchors and is lighter. A kayak anchor does not have to be heavy, it just has to be able to grip the sea floor. This is why makeshift anchors like bum-bells do not work well.


Notice how the anchor rope is tied to the front of the anchor and then attached to the end of the anchor with a piece of 20 pound mono. This is so that if my anchor gets caught, I can pull hard and break the 20 pound mono. This will reverse where the anchor is being pulled and release it.


Also notice that instead of threading the anchor rope through the Float , I attached the float with a carabiner. This prevents the float from knocking against my hull when the anchor is out. You need a Float so that you can recover you anchor if you ever need to dump it.


The anchor rope itself is simple nylon rope . Do not use rope sold as "anchor rope" in stores. This is usually floating rope which is very dangerous to a kayaker. If you flip you kayak, all of that floating rope will be floating around you, making it easy to get tangled up.

Remember, you need three times the depth you are anchoring in rope to get a good hold. So if you are anchoring in 10 feet of water, you need 30 feet of rope out. I keep 50' of rope always attached to my anchor. If I need more, I simply tie on another 50' with a strong knot.


DreamHost Promotional Code